Code Contributor Guidelines
- How to open a GitHub issue & file a bug report
- How to open a GitHub Pull Request
- How to open a PR and contribute code to Rasa Open Source
- 1. Forking the Rasa Repository
- 2. Cloning the Forked Repository Locally
- 3. Update your Forked Repository
- 4. Implement your code contribution
- 5. Push changes to your forked repository on GitHub
- 6. Opening the Pull Request on Rasa Open Source
- 7. Signing the Contributor Licence Agreement (CLA)
- 8. Merging your PR and the final steps of your contribution
- 9. Share your contributions with the world!
- 10. Non-code contributions
How to open a GitHub issue & file a bug report
Working on a new feature or fixing a bug
If you would like to add a new feature or fix an existing bug, we prefer that you open a new issue on the Rasa repository before creating a pull request.
It’s important to note that when opening an issue, you should first do a quick search of existing issues to make sure your suggestion hasn’t already been added as an issue. If your issue doesn’t already exist, and you’re ready to create a new one, make sure to state what you would like to implement, improve or bugfix. We have provided templates to make this process easier for you.
To open a Github issue, go to the RasaHQ repository, select “Issues”, “New Issue” then “Feature Request” or “Bug Report” and fill out the template.

The Rasa team will then get in touch with you to discuss if the proposed feature aligns with the company's roadmap, and we will guide you along the way in shaping the proposed feature so that it could be merged to the Rasa codebase.
Working on an existing feature
If you want to contribute code, but don't know what to work on, check out the Rasa contributors board to find existing open issues.
The issues are handpicked by the Rasa team to have labels which correspond to the difficulty/estimated time needed to resolve the issue.
To work on an existing issue, go to the contributor project board, add a comment stating you would like to work on it and include any solutions you may already have in mind.

Someone from Rasa will then assign that issue to you and help you along the way.
How to open a GitHub Pull Request
What is a Pull Request (PR)?
This is how the GitHub team defines a PR:
“Pull requests let you tell others about changes you’ve pushed to a branch in a repository on GitHub. Once a pull request is opened, you can discuss and review the potential changes with collaborators and add follow-up commits before your changes are merged into the base branch.”
This process is used by both Rasa team members and Rasa contributors to make changes and improvements to Rasa Open Source.
What to know before opening a PR
Opening issues before PRs
We usually recommend opening an issue before a pull request if there isn’t already an issue for the problem you’d like to solve. This helps facilitate a discussion before deciding on an implementation. See How to open a GitHub issue & file a bug report.
Draft PRs
If you're ready to get some quick initial feedback from the Rasa team, you can create a draft pull request.
PRs should be a reasonable length
If your PR is greater than 500 lines, please consider splitting it into multiple smaller contributions.
Code style
To ensure a standardized code style we recommend using formatter black. To ensure our type annotations are correct we also suggest using the type checker mypy.
Formatting and Type Checking
If you want to automatically format your code on every commit, you can use pre-commit. Just install it via pip install pre-commit and execute pre-commit install in the root folder. This will add a hook to the repository, which reformats files on every commit.
If you want to set it up manually, install black via pip install -r requirements-dev.txt. To reformat files execute make formatter.
If you want to check types on the codebase, install mypy using poetry install. To check the types execute make types.
The CI/CD tests that we run can be found in the continous-integration.yml file.
How to open a PR and contribute code to Rasa Open Source
1. Forking the Rasa Repository
Head to Rasa repository and click ‘Fork’. Forking a repository creates you a copy of the project which you can edit and use to propose changes to the original project.
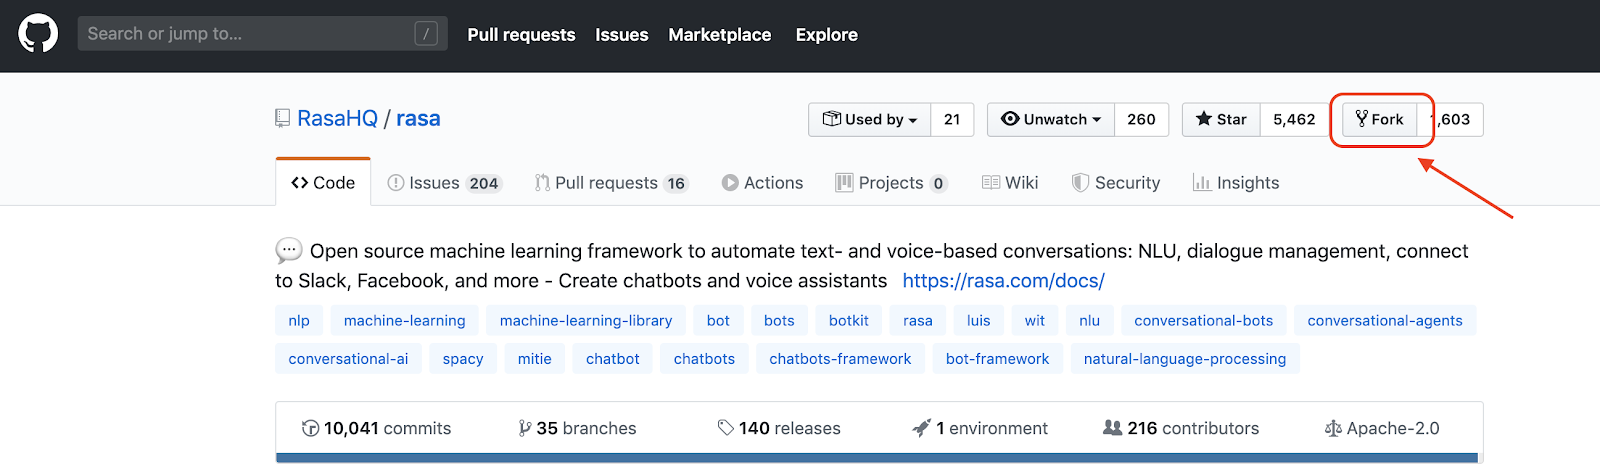
Once you fork it, a copy of the Rasa repository will appear inside your GitHub repository list.
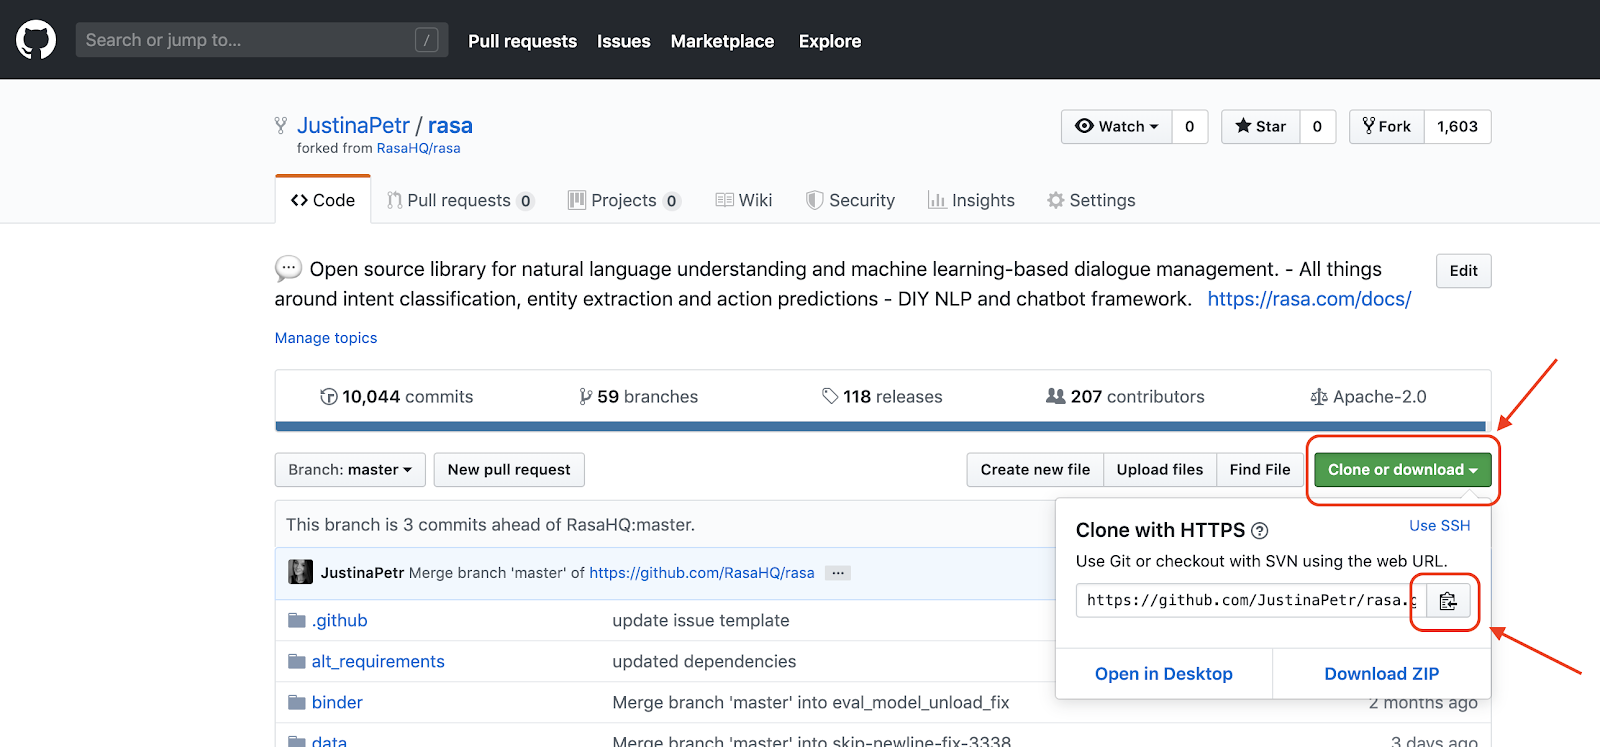
2. Cloning the Forked Repository Locally
To make changes to your copy of the Rasa repository, clone the repository on your local machine. To do that, run the following command in your terminal:
git clone https://github.com/your_github_username/rasa.git
The link to the repository can be found after clicking Clone or download button as shown in the image below:
Note: this assumes you have git installed on your local machine. If not, check out the following guide to learn how to install it.
3. Update your Forked Repository
Before you make any changes to your cloned repository, make sure you have the latest version of the original Rasa repository. To do that, run the following commands in your terminal:
cd rasa
git remote add upstream git://github.com/RasaHQ/rasa.git
git pull upstream main
This will update the local copy of the Rasa repository to the latest version.
4. Implement your code contribution
At this point, you are good to make changes to the files in the local directory of your project.
Alternatively, you can create a new branch which will contain the implementation of your contribution. To do that, run:
git checkout -b name-of-your-new-branch
5. Push changes to your forked repository on GitHub
Once you are happy with the changes you made in the local files, push them to the forked repository on GitHub. To do that, run the following commands:
git add .
git commit -m ‘fixed a bug’
git push origin name-of-your-new-branch
This will create a new branch on your forked Rasa repository, and now you’re ready to create a Pull Request with your proposed changes!
6. Opening the Pull Request on Rasa Open Source
Head to the forked repository and click on a Compare & pull request button.
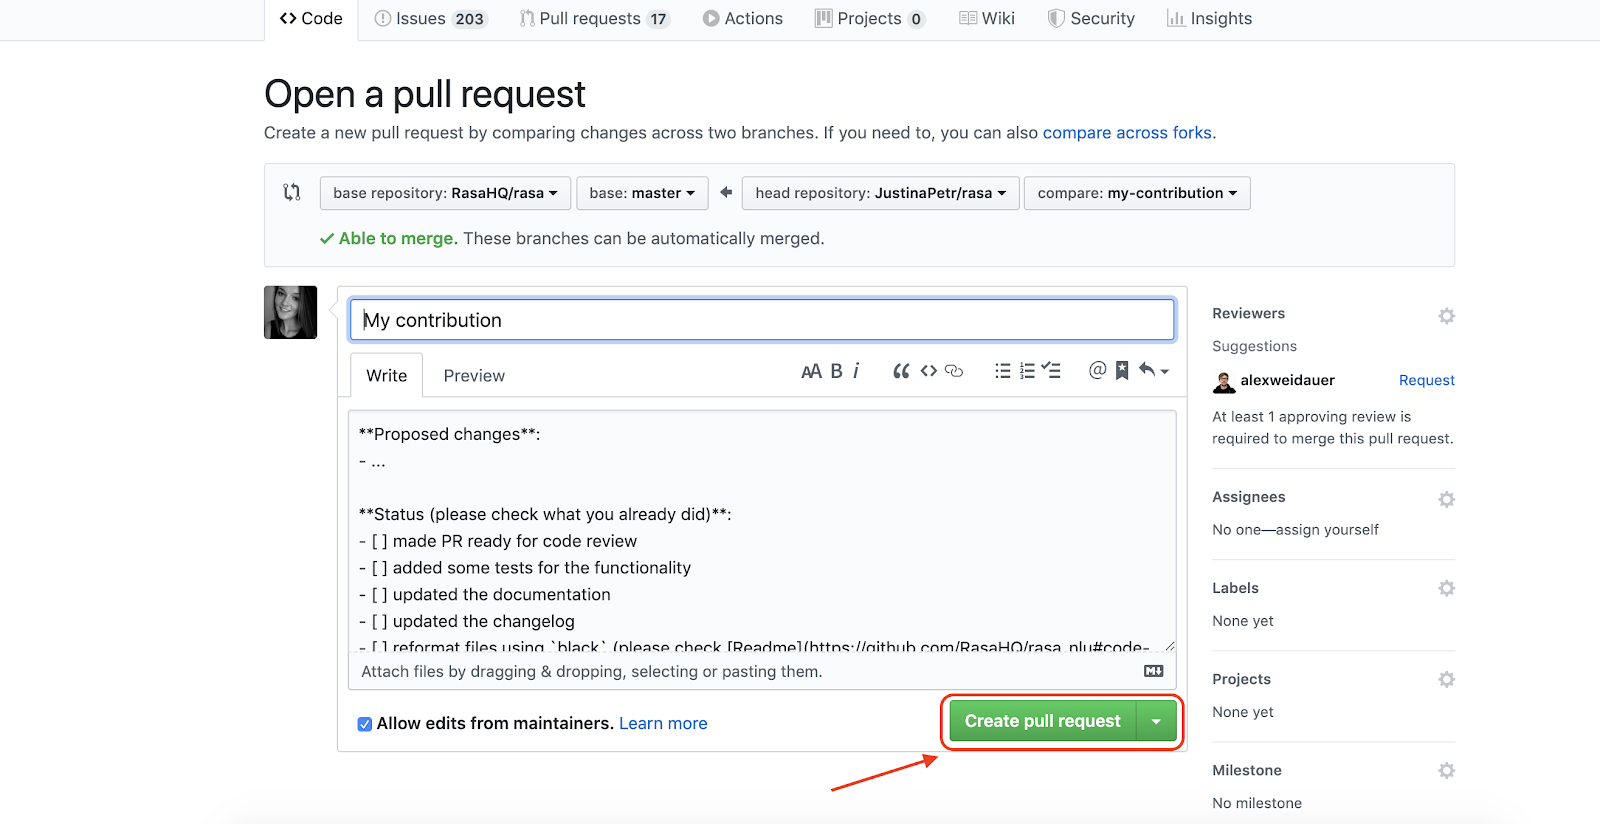
This will open a window where you can choose the repository and branch you would like to propose your changes to, as well as specific details of your contribution. In the top panel menu choose the following details:
- Base repository:
RasaHQ/rasa - Base branch:
main - Head repository:
your-github-username/rasa - Head branch:
name-of-your-new-branch
Next, make sure to update the pull request card with as many details about your contribution as possible. Proposed changes section should contain the details of what has been fixed/implemented, and Status should reflect the status of your contributions. Any reasonable change (not like a typo) should include a changelog entry, a bug fix should have a test, a new feature should have documentation, etc.
If you are ready to get feedback on your contribution from the Rasa team, tick the made PR ready for code review and allow edits from maintainers box.
Once you are happy with everything, click the Create pull request button. This will create a Pull Request with your proposed changes.

7. Signing the Contributor Licence Agreement (CLA)
To merge your contributions to the Rasa codebase, you will have to sign a Contributor License Agreement (CLA).
It is necessary for us to know that you agree for your code to be included into the Rasa codebase and allow us to use it in our later releases. You can find a detailed Rasa Contributor Licence Agreement here.
8. Merging your PR and the final steps of your contribution
Once you sign the CLA, a member from the Rasa team will get in touch with you with the feedback on your contribution. In some cases, contributions are accepted right away, but often, you may be asked to make some edits/improvements. Don’t worry if you are asked to change something - it’s a completely normal part of software development.
If you have been requested to make changes to your contribution, head back to the local copy of your repository on your machine, implement the changes and push them to your contribution branch by repeating instructions from step 5. Your pull request will automatically be updated with the changes you pushed. Once you've implemented all of the suggested changes, tag the person who first reviewed your contribution by mentioning them in the comments of your PR to ask them to take another look. Finally, if your contribution is accepted, the Rasa team member will merge it to the Rasa codebase.
9. Share your contributions with the world!
Contributing to open source can take a lot of time and effort, so you should be proud of the great work you have done! Let the world know that you have become a contributor to the Rasa open source project by posting about it on your social media (make sure to tag @RasaHQ as well), mention the contribution on your CV and get ready to get some really cool Rasa contributor swag!
10. Non-code contributions
Contributing doesn’t start and end with code. You can support the project by planning community events, creating tutorials, helping fellow community members find answers to their questions or translating documentation and news. Every contribution matters! You can find more details on our website.